How to Deal with Foggy Windows


No matter what the climate is like where you live, keeping the temperature comfortable inside your car often means battling foggy windows. If you live in a climate with cold winters, staying warm in your chilly car means turning on the heater — and battling the resultant fog on the inside of your windows. In warm, humid areas, turning on the AC can cause the opposite issue — fog blurring your windows from the outside.


The reason for foggy windows has to do with temperature and the air’s moisture content. On a cold day, any moisture in the air inside your car — from passengers exhaling, from snow on your boots, etc. — turns to condensation when it hits air next to the windows that’s below a certain temperature, called the dew point. The condensation is what makes your car’s windows appear foggy. On a hot, humid day, the opposite happens, when the muggy air outside your car reaches the dew point against your windshield after it’s cooled by your AC system.
Whether the fog is on the inside or the outside of your windows, any time you can’t see clearly in all directions, it’s dangerous. So, it’s important to know how to make sure your windows are clear — no matter the weather.

When It’s Colder Outside Than Inside Your Car…

When you’re dealing with cold weather outside and you turn on the heater inside your car, the fog typically will start to form on the inside of your car windows. Here are some options to clear those windows up:
  • For a quick fix: Lower the temperature inside your car rapidly by turning on the defrost vent with cool air or cracking a window; don’t turn on the heat. This will make the inside of your car cooler and help reduce the fog. Also, turn on your car’s rear-window defogger to help clear up the back window. Though this is a fast and effective method, it could leave you shivering.
  • For a more comfortable solution: Lifehacker advises those who want to be snug and warm while driving to turn on the defroster and blow warm air across the windshield to evaporate the accumulating moisture. If your vehicle’s ventilation system has a recirculate feature, turn it off. When this feature is on, your car’s heat or AC reuses the air inside the car, instead of continually pulling in air from outside.  If you’re trying to defog the windows in cold weather, you want your car to continually take in the dry air. (Not sure if your car has recirculation? Look for a button on the dashboard that has an arrow going in a circle or a semi-circle. Sometimes, it will feature an icon of a car with this type of arrow inside it.)
  • Plan ahead: Keep your car glass as clean as possible — on the inside and the outside. That way, when your glass fogs up, you know the problem isn’t just a dirty windshield. You may also want to think about using a product that you can spray or wipe onto the inside of your windows in order to help prevent fog from forming.

When It’s Warmer Outside than In Your Car…

When the temperature and moisture level outside are greater than inside the car, moisture will condense on the exterior of the car glass. In this situation, the trick is to increase the temperature on the inside of the car to accumulate less moisture on the outside. Keep the following tips in mind:
  • For a quick fix: Use your windshield wipers. This will help get rid of the condensation until you’ve balanced out the temperature.
  • Warm up your car: Turn down the AC to the lowest (least-cool) setting to increase the temperature without it becoming too uncomfortable. If this doesn’t work, turn the AC off completely.
  • Leave recirculation off: As stated above, it’s a good idea to turn off your car’s recirculation feature to battle foggy windows, so the temperature and moisture levels in your car begin to equalize with those outside.
Trying to see through fogged-up windows is a driving hazard, but with these tips, you can help increase your driving safety—no matter what the weather.

Gas Tanks: Why Aren’t All Fuel Doors on the Same Side?


Quick: On which side is your vehicle’s fuel door?

Must you look at the little diamond-shaped arrow on the fuel gauge EVERY time you fill up to know which side holds the fuel filler? Have you ever pulled to the fuel island to discover you’re on the wrong side? Did you utter bad words before or after you said, “Why don’t they put fuel doors on the same side of every car?!?”

The answer to that question is complicated, if not convoluted.

Based on my research into the Federal Motor Vehicle Safety Standards, I came to the conclusion (a conclusion later supported by my contacts at both the Ford Motor Company and Nissan North America) that no U.S. government regulation concerns which side on which the fuel door must be positioned. Much to the chagrin of many motorists, the fuel door can be on either side.
With no legal or marketing motivation, and scant ownership enjoyment implications, car-company engineers are free to place fuel doors on whichever side offers the easiest packaging, according to Ford spokesman Mark Schirmer. He added that there’s not enough room — and no demand — for dual fuel doors.

Preference

Americans prefer left-mounted fuel doors, said Schirmer, referencing a Ford study. A driver’s-side fuel door makes it easier for drivers to place the car’s left fender close to fuel pump. Still, fuel door location is typically not part of the buying decision, added Schirmer.
Those in Japan, India, the United Kingdom, Australia, Hong Kong, New Zealand, and countries in southern Africa drive on the left side of the road and sit on the right side of the car, and it appears they prefer right-mounted fuel doors, given the tendencies of cra manufacturers. For at least 25 years, the conventional wisdom among auto writers has been that Europeans like right-side doors. However, when I posed this to my industry co-horts, no car company would speculate if or why that might be true.
Nissan, like most automakers, produces some vehicles with left fuel doors and some with right doors.

Reasons

“The placement of the fuel door is mainly a factor of fuel tank design, location and underbody packaging,” Nissan’s Steve Yaeger wrote in an email. “With all of the structure and components located underneath the vehicle, (engineers) would quickly encounter restrictions in trying to route the filler tube to the same side on every vehicle.”
If mechanisms such as a “big, honkin’ speaker” must be placed on the left side, engineers put the fuel door on the right, notes Schirmer.
The bottom line: Fuel door position is not a random choice, but if engineers have a good reason to place fuel doors on the right, that’s where they go.
If you can’t remember the location of your fuel door, don’t be ashamed to look at the little diamond-arrow on your fuel gauge … BEFORE you pull up to the pump.


DIY: How to Change Windshield Wiper Blades


Windshield wipers are an often overlooked part of your car's safety system. If your windshield wipers are not working properly, it can be difficult to see when it rains or snows. Faulty windshield wiper blades can smear your windshield, creating visibility hazards. So, it's important to make sure your wiper blades are in good shape.

What Needs To Be Done:

Windshield wiper blades need to be inspected and replaced, if needed, on a regular basis.

Why Do It?

  • Windshield wiper blades are made out of rubber, which can wear even with limited use.
  • By being certain that your windshield wiper blades are in optimum condition, you are ensuring the safety of your vehicle and its passengers.
  • If you are driving your car in pouring rain, snow or sleet, worn-out wiper blades can impede the wipers' ability to clean the windshield, which can limit your visibility.
  • Making sure your windshield wipers are newly inspected and replaced, if necessary, can help ensure safety.

How Often?

The frequency at which your windshield wiper blades need replacement depends, in part, on the conditions where you live and drive.Some general information is listed below, but always defer to your car owner's manual and the information that comes with your wiper blades for advice on maintenance.


Check? Replacement?
Sunny, Hot Climate At least every six months At least once yearly
Even if you use your wipers very little, the hot sun can damage the rubber on your wiper blades, making the wipers unusable,according to Autos.yahoo.com.
Cold Climate At least every six months At least once yearly
According to Autos.com, the grit and salt used in cold climates can wear out the rubber wiper blades quickly.
Dusty And Sandy Regions Every several months Every six months to a year
If you regularly drive in dusty or sandy areas, even if you don't use your wipers often, grit and sand can accumulate around and on the wiper blade, resulting in fast wear.


How to Do It:

Changing your wiper blades is simple. If you're unsure about your wiper blade-changing abilities, it's always a good idea to leave it to the professionals. This is something that is often done when you take your car in for an oil change, so ask your car dealership or quick-lube shop about it the next time you go in. But, if you want to do it yourself, you can follow these steps:

Step 1. Remove the old wiper.

How to check your wiper blades.
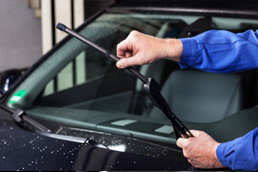
Lift the wiper arm away from the windshield, depress the small tab and slide the blade off the arm.
Lift the wiper arm away from the windshield and depress the small tab on the underside of the wiper where it meets the wiper arm. When the tab is depressed, slide the wiper blade off the arm by pulling the center toward the bottom of the arm.

Step 2. Line up the new wiper blade with the arm.

Move the hook on the arm over the plastic clip on the new wiper blade.

Step 3. Pull it tight.

Replacing windshield wiper blades.
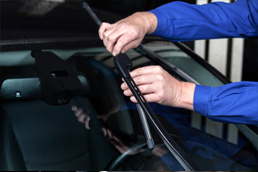
Attach the new wiper blade, making sure it clicks into place.
Pull the wiper blade tight onto the arm. You will hear a clicking sound when it clicks into place. Now, simply lower the arm slowly back onto the windshield and repeat this process on the other wiper arm.

Tips for Checking Your Tire Pressure


Proper maintenance of your car can be crucial for its long life and safe operation. Your tires are one of the most important parts of your car; literally the place where the rubber meets the road. Regular care and maintenance are crucial to the safe and reliable performance of your vehicle.


The air pressure inside your tires needs to be checked regularly to help ensure your vehicle runs smoothly and efficiently. Underinflated tires can contribute to increased wear and tear, and also reduce fuel efficiency, says Edmunds. Tires can lose air in a variety of ways, including a tiny hole, a leak on the the valve stem or an issue with the wheel on which it’s mounted, according to Popular Mechanics. In addition, changing temperatures can affect the air pressure of your tires. Tire pressure can vary 1-2 pounds per square inch (psi) for every 10-degree difference in ambient temperature, according to Goodyear. Keep in mind, it can be difficult to tell if a radial tire needs air just by looking at it, so tires should be checked.

When Should I Check?

Tires warm up when your car is moving. Air expands inside a “hot” tire, so the air pressure reading will likely not be accurate for a hot tire. Tire air pressure should be checked once a month when the tires are cold, says Edmunds. But, you may want to consider checking your tire pressure more frequently in the following instances, which may make the affect the pressure:
  • If you run over a sharp object, like a nail, that can puncture the rubber.
  • If you strike a curb or other object.
  • If the weather suddenly changes from warm to cold.
If your car has a tire pressure sensor and the light on the dashboard is illuminated, you should check the tire pressure immediately on all four tires, says Bridgestone.

How Should I Check?

Edmunds recommends some simple steps for properly checking tire pressure:

Step 1. Purchase a tire gauge. Tire gauges are small enough to fit in your glove box, and they’re a handy tool to have. The newer digital tire gauges can be more accurate — and easier to read — than the older ones. If you don’t want to purchase a gauge, you can go to the air pump at a gas station, which usually has a gauge on the hose. That’s convenient, because if you find that your tires need air, you’re already there.

Step 2. Discover the proper air pressure for your car. Tire pressure is measured in pounds per square inch, or psi. You can often find the right psi for your vehicle on a yellow sticker inside the driver’s-side door jamb, or you can consult your owner’s manual. Remember, the ideal air pressure may be different for the front and rear tires.

Step 3. Remove the air valve cap from your tire. It’s easy to lose this little valve cap. Be sure to place it in your pocket or someplace where it will not roll away or quickly disappear.

Step 4. Press the tire gauge against the open valve stem. You will hear a hiss of air as you press down. Don’t be concerned; this is normal.

Step 5. Read the air pressure gauge. The number will appear on the dial or digital screen on the tire gauge. Compare this number with the recommended tire pressure for the tire. If it’s too low, you can add air. If the pressure is too high, you can let air out of the tire.

The all-new #Ford GT Supercar’s Digital Instrument Display Is The Dashboard of The Future


Like the glass cockpit in airplanes and race cars, the all-new Ford GT features an all-digital instrument display in the car’s dashboard that quickly and easily presents information to the driver, based on five special driving modes.

The innovative 10-inch wide digital instrument display is far advanced from the original Ford GT, when the cockpit was hardwired with a fixed set of analog gauges, buttons and knobs across the dashboard that had to address almost every situation.

“Driver focus and attention are key with such high performance,” said Jamal Hameedi, chief engineer, Ford Performance. “We’ve designed the GT with a sleek digital instrument display that changes depending on driving mode in ways that are important and usable to the driver.”

Watch the video here - http://ow.ly/Zjey307WRYo

Ken Grody Ford Sale Special - New 2017 Ford Fusion SE


The 2017 Fusion is a testament to contemporary design. While its stunning, sculpted exterior has earned Fusion plenty of style cred, it’s more than just design for design’s sake. Fusion is equipped with thoughtful features like available smart driver-assist technologies and voice-activated controls. Driving one tells the world you know where you’re going. 

Ken Grody Ford Sale Special - 2017 Ford Explorer XLT


The power and driving dynamics of Explorer come wrapped in an eye-catching design that boasts authentic comfort and style. And because it was built for our modern active lives, you can also expect an interior space for the kids, the dog, the sports equipment, camping gear and just about everything else you may need on the road to adventure.

Ken Grody Ford